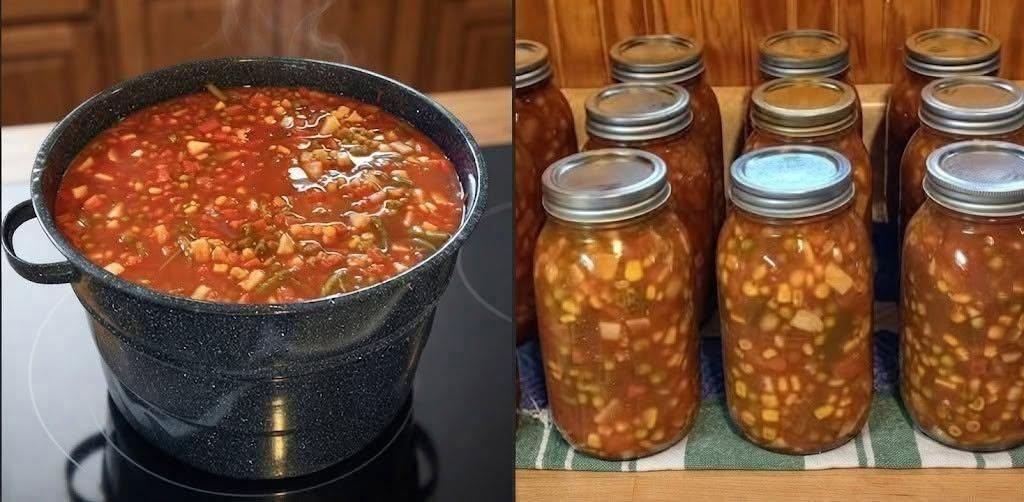
-
Prep Time: 45 minutes
-
Cook & Simmer Time: 20 minutes
-
Processing Time:
-
Pints: 55 minutes
-
Quarts: 85 minutes
-
-
Depressurization & Cooling Time: 45–60 minutes in-canner + 12–24 hours room temperature cooling
-
Total Active Time: Approximately 2 hours 15 minutes
-
Yield: Approximately 8 pint jars (500 ml each) or 4 quart jars (1 L each)
Safety Requirements & Rule Checklist
Before beginning, keep these critical safety parameters in mind:
-
Never use thickeners: Do not add flour, cornstarch, cream, rice, barley, noodles, or pasta before canning. These insulate heat transfer inside the jar and cause under-processing. Add grains or dairy only upon reheating for serving.
-
Uniform slicing: Cut all vegetables into evenly sized pieces ($1/2\text{-inch}$ to $3/4\text{-inch}$ cubes) to guarantee predictable heat penetration to the jar core.
-
Clean equipment: Inspect mason jars for chips, hair-line cracks, or defects. Use brand-new, unused two-piece canning flat lids.
Ingredients
Fresh Produce
-
Tomatoes: 6 cups diced, peeled core-free ripe tomatoes (or no-salt-added crushed canned tomatoes)
-
Carrots: 3 cups peeled, sliced into $1/4\text{-inch}$ rounds
-
Potatoes: 3 cups peeled, cubed into $1/2\text{-inch}$ dice (use waxy varieties like Yukon Gold or red potatoes; starchy russets will break down)
-
Green Beans: 2 cups trimmed and snapped into $1\text{-inch}$ lengths
-
Sweet Corn: 1.5 cups whole sweet corn kernels (fresh cut or frozen)
-
Celery: 1.5 cups diced with leaves
-
Yellow Onion: 1.5 cups finely diced
-
Garlic: 3 cloves, finely minced
Broth & Seasonings
-
Vegetable or Chicken Stock: 6 cups low-sodium filtered stock or spring water
-
Olive Oil: 1 tablespoon (keep oil minimal to avoid seal failures)
-
Canning & Pickling Salt: 1 teaspoon per quart jar, or $1/2$ teaspoon per pint jar (optional, for flavor only)
-
Black Pepper: 1 teaspoon freshly ground coarse black pepper
-
Dried Thyme: 1 teaspoon
-
Dried Oregano: 1 teaspoon
-
Bay Leaves: 4 small whole dried leaves (1 leaf per quart or $1/2$ leaf per pint)
Equipment Needed
-
Tested pressure canner with an accurate dial or weighted gauge
-
Mason jars (8 pint jars or 4 quart jars) with clean bands and fresh lids
-
Jar lifter, canning funnel, and magnetic lid wand
-
Non-metallic headspace measuring tool/bubble remover
-
Large 8-quart stainless steel stockpot
-
Clean microfiber towels and white distilled vinegar
Step-by-Step Instructions
Step 1: Preparation & Sanitation
-
Inspect canning jars carefully for nicks, micro-cracks, or uneven rims. Wash jars, rings, and utensils thoroughly in hot, soapy water and rinse well.
-
Keep jars hot until filling by placing them in the simmering canner water or a warm oven set to $95^\circ\text{C}$ ($200^\circ\text{F}$) to avoid thermal shock breakage.
-
Fill your pressure canner with 2 to 3 inches of clean water (roughly 3 quarts) and heat on low so it is hot but not boiling (around $60^\circ\text{C}$ / $140^\circ\text{F}$). Add 2 tablespoons of white vinegar to the canner water to avoid hard-water film on the jars.
Step 2: Prepare the Vegetables
-
Place a large stainless steel stockpot over medium heat ($175^\circ\text{C}$). Add 1 tablespoon olive oil.
-
Add diced onions, celery, and minced garlic. Sauté for 3 to 4 minutes until onions are translucent and fragrant. Do not brown.
-
Add diced tomatoes, carrots, cubed potatoes, cut green beans, and sweet corn.
-
Pour in the 6 cups of vegetable stock. Stir in black pepper, dried thyme, and dried oregano.
-
Raise heat to medium-high and bring soup to a rolling boil. Once boiling, immediately reduce heat to medium-low and simmer uncovered for 5 minutes. Vegetables should remain crisp and par-cooked, not mushy.
Step 3: Jar Filling & Headspace Management
-
Carefully remove one hot jar at a time from warming water using the jar lifter and place on a dry kitchen towel.
-
Position the canning funnel over the jar mouth.
-
Ladle a balanced ratio of solids and hot cooking liquid into the jar, leaving exactly 1 inch (2.5 cm) of headspace at the top. Headspace is essential for expansion during pressure canning.
-
Insert a clean bubble popper tool around the interior perimeter of the jar to release trapped air pockets. Re-measure headspace and adjust liquid if necessary.
-
If using salt, add $1/2$ teaspoon per pint or 1 teaspoon per quart directly into the top of the jar. Add a small bay leaf piece.
-
Dip a clean paper towel in distilled white vinegar and wipe the jar rim and threads thoroughly. Any grease, salt grain, or vegetable fragment will cause seal failure.
-
Center a clean lid onto the rim. Screw the threaded metal band down over the lid until resistance is met, then turn until fingertip-tight. Do not over-tighten with wrist force.
Step 4: Purging the Canner
-
Using the jar lifter, load jars upright onto the rack inside the pressure canner, leaving slight space between jars for steam circulation.
-
Fasten the canner lid securely, ensuring the seal or gasket is seated properly.
-
Turn stove burner to high heat. Leave the vent pipe (petcock) open.
-
Watch for a steady, continuous column of steam escaping from the vent pipe. Once a forceful plume of steam forms, start a timer and vent the canner for 10 full minutes. This removes trapped air so the canner fills with pure pressurized steam.
Step 5: Pressure Processing
-
After 10 minutes of uninterrupted venting, place the counterweight or close the petcock to begin building pressure.
-
Adjust the heat down slightly as the target pressure approaches to stabilize the gauge. Process according to your equipment and elevation:
-
Weighted Gauge Canners:
-
0 to 1,000 ft elevation: 10 PSI
-
Above 1,000 ft elevation: 15 PSI
-
-
Dial Gauge Canners:
-
0 to 2,000 ft elevation: 11 PSI
-
2,001 to 4,000 ft elevation: 12 PSI
-
4,001 to 6,000 ft elevation: 13 PSI
-
6,001 to 8,000 ft elevation: 14 PSI
-
-
-
Once the target pressure is reached, begin timing:
-
Pints: 55 minutes
-
Quarts: 85 minutes
-
-
Monitor heat closely. If pressure dips below target PSI at any moment, increase heat to restore target pressure and restart the timer from zero.
Step 6: Safe Depressurization & Curing
-
When the processing time completes, turn off heat completely. Do not move, bump, or force-cool the canner.
-
Let the canner cool naturally until the internal pressure returns completely to zero (0 PSI) and the lid lock pin drops. This typically takes 40 to 60 minutes.
-
Once zero pressure is verified, wait 10 additional minutes before removing the weight or opening the petcock.
-
Unlock and lift the lid away from your face to allow remaining steam to disperse safely. Wait 10 minutes before handling the jars.
-
Use the jar lifter to remove jars straight up without tilting. Place them onto a towel-lined surface in a draft-free space, spaced 1 to 2 inches apart.
-
Leave jars undisturbed for 12 to 24 hours. Do not press down on the lids, retighten bands, or move them while hot.
Quality Testing, Storage & The End of Recipe Protocol
24-Hour Seal Verification
-
After 12 to 24 hours, check the seal on each jar. The center of the lid should be dished inward and remain rigid when pressed. A sealed jar will emit a clear, high-pitched ring when lightly tapped with a spoon.
-
If a lid flexes or pops back up, the jar did not seal. Unsealed jars must be stored in the refrigerator and consumed within 3 days, or frozen in freezer-safe containers immediately.
-
For sealed jars, unscrew and remove the metal screw bands to prevent rusting or hidden seal failure.
-
Wipe the jar exteriors clean with a damp cloth, dry thoroughly, and clearly label each jar with the contents, batch number, and canning date.
-
Store in a cool, dark, dry pantry ($10^\circ\text{C}$ to $21^\circ\text{C}$ / $50^\circ\text{F}$ to $70^\circ\text{F}$). For peak flavor and nutrient retention, consume within 12 to 18 months.
Reheating for Serving
Empty contents into a saucepan. Bring to a rolling boil over medium heat and boil vigorously for at least 10 minutes prior to tasting or serving. If desired, stir in cooked egg noodles, wild rice, lentils, or a splash of heavy cream during the final 3 minutes of boiling.
Nutritional Profile
Values calculated per 1 cup (240 ml) serving of prepared soup (base broth and vegetables, excluding optional salt additions):
| Metric | Amount Per Serving | % Daily Value* |
| Calories | 78 kcal | — |
| Total Fat | 1.8 g | 2% |
| Saturated Fat | 0.3 g | 1% |
| Trans Fat | 0.0 g | — |
| Cholesterol | 0 mg | 0% |
| Sodium | 115 mg | 5% |
| Total Carbohydrates | 14.5 g | 5% |
| Dietary Fiber | 2.8 g | 10% |
| Total Sugars | 4.2 g | — |
| Protein | 2.4 g | 5% |
| Vitamin A | 210 mcg | 23% |
| Vitamin C | 18 mg | 20% |
| Potassium | 380 mg | 8% |
| Calcium | 34 mg | 3% |
| Iron | 1.1 mg | 6% |