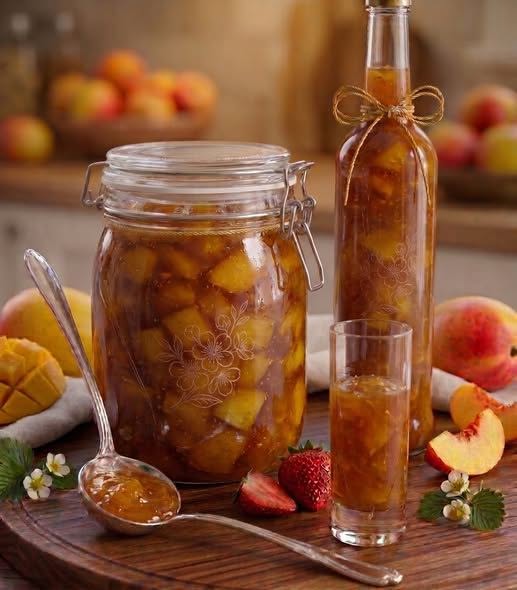
-
Prep Time: 25 minutes
-
Maceration Time: 30 minutes
-
Active Cooking Time: 25 to 30 minutes
-
Water-Bath Processing Time (Optional for shelf stability): 10 minutes
-
Total Time: Approximately 1 hour 35 minutes
-
Skill Level: Intermediate
-
Heat Intensity: Low to Medium-High (staged adjustments)
Equipment Needed
-
6- to 8-quart heavy-bottomed stainless steel or enameled Dutch oven (avoids scorching and metallic reactions)
-
Potato masher or immersion blender
-
Heat-resistant silicone spatula or flat-edged wooden spoon
-
4 half-pint (8 oz) glass canning jars with new lids and clean bands
-
Large canning pot with rack (for water bath canning)
-
Jar lifter and canning funnel
-
Candy/deep-fry thermometer or digital instant-read thermometer
-
Small ceramic saucer (placed in the freezer before cooking)
Ingredients
Fruit Base
-
Peaches: 2 lbs (approx. 900 g, about 5–6 medium peaches), peeled, pitted, and diced into 1/2-inch pieces
-
Mangoes: 2 lbs (approx. 900 g, about 3–4 medium mangoes, preferably Ataulfo or Alphonso for silky texture and low fiber), peeled, seeded, and diced into 1/2-inch pieces
Sweetener & Gelling Agents
-
Granulated White Cane Sugar: 2 1/2 cups (500 g)
-
Fresh Lemon Juice: 1/4 cup (60 ml, from approx. 2 medium juicy lemons)
-
Lemon Zest: 1 teaspoon, finely grated (adds natural citrus oils and structure)
Enhancers
-
Pure Vanilla Extract: 1/2 teaspoon (optional, added at flameout)
-
Fine Sea Salt: 1/8 teaspoon
-
Unsalted Butter: 1/2 teaspoon (optional, controls foam development during hard boiling)
Step-by-Step Instructions
Phase 1: Preparation and Maceration
-
Prepare the Peaches: Score a small “X” on the bottom of each peach. Submerge them in boiling water for 45 seconds, then immediately plunge them into an ice-water bath. Slip off the skins, remove the pits, and chop the flesh into 1/2-inch cubes.
-
Prepare the Mangoes: Slice off both cheeks along the flat pit. Score the fruit flesh into a checkerboard pattern without cutting through the skin, invert the cheek, and slice off the cubes directly into your prep bowl. Trim any remaining flesh around the seed.
-
Macerate: In your large Dutch oven or non-reactive stockpot, combine the chopped peaches, diced mangoes, granulated sugar, fresh lemon juice, lemon zest, and sea salt. Stir thoroughly until the fruit is completely coated in sugar. Cover and let stand at room temperature for 30 minutes. The sugar draws out the fruit juices, creating a syrup that prevents fruit breakdown before pectin sets.
Phase 2: Cook Stages and Heat Intensities
Stage 1: The Initial Dissolution & Simmer
-
Heat Intensity: Medium-Low
-
Duration: 6–8 minutes
-
Place the pot over medium-low heat. Stir constantly until all sugar crystals have completely dissolved and the mixture begins to weep copious amounts of liquid. Do not let the mixture boil vigorously while sugar remains undissolved, as this can cause crystallization. If using butter to suppress surface foam, stir it in now.
Stage 2: Softening & Texture Reduction
-
Heat Intensity: Medium
-
Duration: 8–10 minutes
-
Increase heat to medium. Bring the liquid to a steady simmer. Stir every 1 to 2 minutes with a wooden spoon or spatula, scraping across the entire bottom and corners of the pot to prevent hot spots. Use a potato masher to press down on approximately half of the peach and mango pieces to release more pectin and juices, leaving the rest intact for a textured, preserves-style finish.
Stage 3: The Rapid Gel Boil
-
Heat Intensity: Medium-High
-
Duration: 10–12 minutes
-
Increase the flame to medium-high. Bring the mixture to a full, rolling boil—one that bubbles vigorously and cannot be stirred down.
-
Stir continuously during this phase. Watch the bubble structure change: at first, bubbles will appear light, rapid, and watery. Over several minutes, the mixture darkens to an amber-gold hue, and bubbles turn glossy, slow, and molten, bursting heavily at the surface.
-
Monitor your thermometer closely. The mixture is ready when it reaches 220°F (104.5°C) at sea level (adjust downward by 1°F for every 500 feet of altitude above sea level).
Phase 3: The Gel Test & Finishing
-
The Freezer Plate Test: Remove the pot from heat to prevent overcooking. Pull the chilled saucer from the freezer. Spoon 1/2 teaspoon of hot jam onto the plate and let it rest for 1 minute. Push the edge of the jam gently with your index finger:
-
If it wrinkles and holds a soft mound: The pectin structure is fully set.
-
If it runs and behaves like syrup: Return the pot to medium-high heat and boil for an additional 2–3 minutes before re-testing.
-
-
Flameout Additions: Once proper consistency is reached, remove from heat completely. Skim off any residual surface foam with a stainless steel spoon. Stir in the pure vanilla extract if desired.
Canning & Storage Options
Refrigerator / Freezer Method (Short-Term Storage)
-
Ladle warm jam into clean glass jars, leaving 1/2-inch of headspace at the top to allow for natural expansion.
-
Wipe the rims with a damp cloth, apply lids, and let sit at room temperature for 2 hours until cool.
-
Store in the refrigerator for up to 3–4 weeks, or freeze for up to 6 months.
Boiling Water-Bath Method (Shelf-Stable Storage)
-
While cooking the jam, sterilize your jars and keep them warm in hot water.
-
Ladle hot jam into hot jars, leaving exactly 1/4-inch headspace.
-
Run a clean bubble popper or thin plastic utensil down the sides of each jar to release trapped air bubbles.
-
Wipe jar rims clean with a clean paper towel dampened with white vinegar to dissolve any fruit sugars.
-
Center flat lids on jars and screw band rings down until fingertip-tight (do not over-tighten).
-
Lower jars onto the rack in a boiling water-bath canner, ensuring jars are covered by at least 1–2 inches of water.
-
Cover canner with lid, return water to a rolling boil, and process for 10 minutes (add 5 minutes for altitudes between 1,001–3,000 feet; add 10 minutes between 3,001–6,000 feet).
-
Turn off heat, remove canner lid, and let jars rest in the water for 5 minutes.
-
Lift jars vertically without tilting, place them onto a clean towel-lined surface, and let them cool undisturbed for 12 to 24 hours. Check that all lids have sucked down with a concave seal. Sealed jars keep in a cool, dark pantry for up to 12 months.
Chef’s Technical Notes for Best Results
-
Choose Ripe, Firm Fruit: Overly ripe fruit loses its natural acidity and pectin strength. For the strongest set without boxed pectin, select fruit that is fragrant and yielding to gentle pressure, but not mushy.
-
Pan Geometry Matters: Use a wide, shallow pot rather than a tall, narrow one. The broader surface area allows steam to evaporate rapidly, reducing the cooking time and preserving fresh, bright stone-fruit flavors.
-
Spice Pairings: For subtle warmth, add 1 whole cinnamon stick, 1 star anise pod, or 1 tablespoon of finely grated fresh ginger directly to the pot during Stage 2, discarding whole spices right before canning.
Nutritional Information
Nutritional values are calculated per single serving (1 tablespoon / approx. 20 grams) based on an estimated yield of 32 total servings.
| Nutrient | Amount Per Serving | Daily Value (% DV)* |
| Calories | 45 kcal | — |
| Total Fat | 0 g | 0% |
| Saturated Fat | 0 g | 0% |
| Trans Fat | 0 g | — |
| Cholesterol | 0 mg | 0% |
| Sodium | 10 mg | 0% |
| Total Carbohydrates | 11.5 g | 4% |
| Dietary Fiber | 0.4 g | 1% |
| Total Sugars | 11 g | — |
| Includes Added Sugars | 8 g | 16% |
| Protein | 0.2 g | 0% |
| Vitamin C | 3.5 mg | 4% |
| Vitamin A | 12 mcg | 1% |
| Potassium | 24 mg | 1% |
| Calcium | 2 mg | 0% |
| Iron | 0.05 mg | 0% |